Add custom action button
Overview
This guide covers how to add custom action buttons to the Shopware Administration using the manifest file. This works for simple applications; however, to write more advanced applications, the Meteor Admin SDK is recommended. It has many more features and is more flexible.
For further details and guidance on custom action buttons, refer to the documentation provided on the Meteor Admin SDK's action button section.
One extension possibility in the Administration is the ability to add custom action buttons to the smartbar. For now, you can add them in the smartbar of detail and list views:
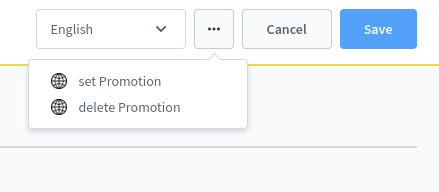
To get those buttons, you start in the admin section of your manifest file. There you can define <action-button> elements in order to add your button, as seen as below:
<?xml version="1.0" encoding="UTF-8"?>
<manifest xmlns:xsi="http://www.w3.org/2001/XMLSchema-instance" xsi:noNamespaceSchemaLocation="https://raw.githubusercontent.com/shopware/shopware/trunk/src/Core/Framework/App/Manifest/Schema/manifest-3.0.xsd">
    <meta>
        ...
    </meta>
    <admin>
        <action-button action="setPromotion" entity="promotion" view="detail" url="https://example.com/promotion/set-promotion">
            <label>set Promotion</label>
        </action-button>
        <action-button action="deletePromotion" entity="promotion" view="detail" url="https://example.com/promotion/delete-promotion">
            <label>delete Promotion</label>
        </action-button>
        <action-button action="restockProduct" entity="product" view="list" url="https://example.com/restock">
            <label>restock</label>
        </action-button>
    </admin>
</manifest>
For a complete reference of the structure of the manifest file take a look at the Manifest reference.
An action button must have the following attributes:
action: Unique identifier for the action, can be set freely.entity: Here you define which entity you're working on.view:detailorlist; to set the view the button should be added to. Currently, you can choose between detail and listing view.
When the user clicks on the action button your app receives a request similar to the one generated by a webhook. The main difference is that it contains the name of the entity and an array of ids that the user selected (or an array containing only a single id if the action button was executed on a detail page).
A sample payload may look like the following:
INFO
Starting from Shopware version 6.4.1.0, the current shopware version will be sent as a sw-version header.
Again you can verify the authenticity of the incoming request, like with webhooks, by checking the shopware-shop-signature. It also contains the SHA256 HMAC of the request body, that is signed with the secret your app assigned the shop during the registration.
Providing feedback in the Administration
INFO
This feature was added in Shopware 6.4.3.0, previous versions will ignore the response content.
INFO
Starting from Shopware version 6.4.8.0, the requests of the tab and custom modal have the following additional query parameters:
shop-idshop-urltimestampsw-context-languagesw-user-languageshopware-shop-signature
You must make sure to verify the authenticity of the incoming request by checking the shopware-shop-signature, which is a hash of the request's query part, signed with the shop's secret key.
If you want to trigger an action inside the Administration upon completing the action, the app should return a response with a valid body and the header shopware-app-signature containing the SHA256 HMAC of the whole response body signed with the app secret. If you do not need to trigger any actions, a response with an empty body is also always valid.
Opening a new tab for the user
Examples response body: To open a new tab in the user browser you can use the openNewTab action type. You need to pass the url that should be opened as the redirectUrl property inside the payload.
Show a notification to the user
To send a notification, you can use the notification action type. You need to pass the status property and the content of the notification as message property inside the payload.
Reload the current page
To reload the data in the user's current page you can use the reload action type with an empty payload.
Open a custom modal
To open a modal with the embedded link in the iframe, you can use the openModal action type. You need to pass the url that should be opened as the iframeUrl property and the size property inside the payload.
General structure
actionType: The type of action the app want to be triggered, includingnotification,reload,openNewTab,openModalpayload: The needed data to perform the action.redirectUrl: The url to open new tabiframeUrl: The embedded link in modal iframestatus: Notification status, includingsuccess,error,info,warningmessage: The content of the notificationsize: The size of the modal inopenModaltype, includingsmall,medium,large,fullscreen, defaultmediumexpand: The expansion of the modal inopenModaltype, includingtrue,false, defaultfalse
Using Custom Endpoints as target
It is also possible to use custom endpoints as target for action buttons.
INFO
This feature was added in Shopware 6.4.10.0, previous versions don't support relative target urls for action buttons.
To use custom endpoints as the target url for action buttons you can define the target url as a relative url in your apps manifest.xml:
<?xml version="1.0" encoding="UTF-8"?>
<manifest xmlns:xsi="http://www.w3.org/2001/XMLSchema-instance" xsi:noNamespaceSchemaLocation="https://raw.githubusercontent.com/shopware/shopware/trunk/src/Core/Framework/App/Manifest/Schema/manifest-3.0.xsd">
    <meta>
        ...
    </meta>
    <admin>
      <action-button action="test-button" entity="product" view="list" url="/api/script/action-button">
        <label>test-api-endpoint</label>
      </action-button>
    </admin>
</manifest>
And then add the corresponding app script that should be executed when the user clicks the action button.
// Resources/scripts/api-action-button/action-button-script.twig
{% set ids = hook.request.ids %}

{% set response = services.response.json({
    "actionType": "notification",
    "payload": {
        "status": "success",
        "message": "You selected " ~ ids|length ~ " products."
    }
}) %}

{% do hook.setResponse(response) %}
As you can see it is possible to provide a JsonResponse to give feedback to the user in the Administration.