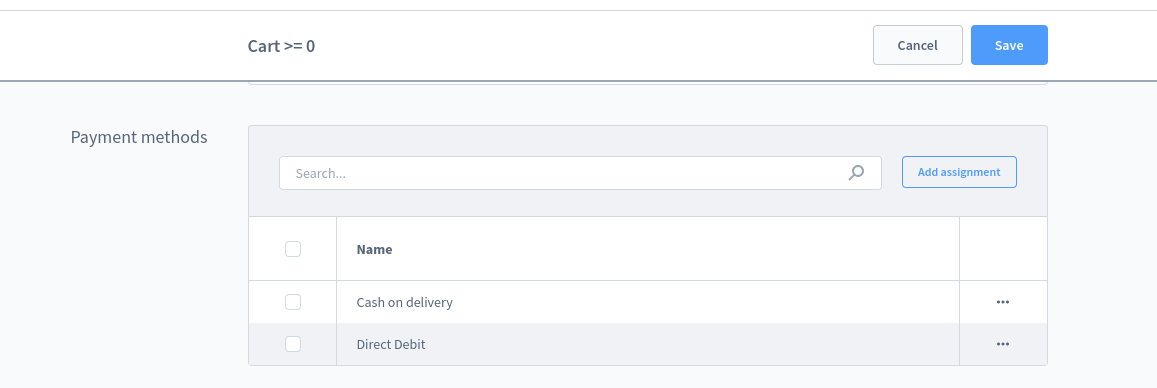
Add rule assignment configuration
INFO
The rule assignment configuration is available from Shopware Version 6.4.8.0
Overview
You want to create a custom card in the rule assignment, where you can add or delete assignments? This guide gets you covered on this topic. Based on an example of the configuration of the Dynamic Access plugin, you will see how to write your configuration.
Prerequisites
This guide does not explain how to create a new plugin for Shopware 6. Head over to our Plugin base guide to learn how to create a plugin at first:
Creating the index.js file
The first step is creating a new directory like so <plugin root>/src/Resources/app/administration/src/module/sw-settings-rule/extension/sw-settings-rule-detail-assignments. Right afterwards, create a new file called index.js in there.
Your custom module directory isn't known to Shopware 6 yet. The entry point of your plugin is the main.js file. That's the file you need to change now, so that it loads your extended component. For this, simply add the following line to your main.js file:
// <plugin root>/src/Resources/app/administration/src/main.js
import './module/sw-settings-rule/extension/sw-settings-rule-detail-assignments';
Now your module's index.js will be executed.
Override the component
Your index.js is still empty now, so let's override the sw-settings-rule-detail-assignments component. This is technically done by calling the method override method of our ComponentFactory, which is available through our third party wrapper. This method expects a name, and a configuration for the component you want to override.
// <plugin root>/src/Resources/app/administration/src/module/sw-settings-rule/extension/sw-settings-rule-detail-assignments/index.js
Component.override('sw-settings-rule-detail-assignments', {
    // override configuration here
});
Overriding the computed
Now your plugin is overriding the sw-settings-rule-detail-assignments component, but currently this has no effect. In the associationEntitiesConfig computed property the configuration of the rule assignment is built and returned to the method which initiates the component. Because of this, you have to override this computed property, get the computed property of the original component, add your own configuration of the rule assignment and return the whole configuration array.
// <plugin root>/src/Resources/app/administration/src/module/sw-settings-rule/extension/sw-settings-rule-detail-assignments/index.js
Component.override('sw-settings-rule-detail-assignments', {
    computed: {
        associationEntitiesConfig() {
            const associationEntitiesConfig = this.$super('associationEntitiesConfig');
            associationEntitiesConfig.push(/* insert your configuration here */);
            return associationEntitiesConfig;
        },
    }
});
Adding the configuration
The configuration of the rule assignment is passed as an object and offers a wide range of options. Just have a look onto one example configuration item of the Dynamic Access plugin:
// Example of a configuration item
getRuleAssignmentConfig()
{
    return [
        {
            id: 'swagDynamicAccessProducts',
            notAssignedDataTotal: 0,
            entityName: 'product',
            label: 'swag-dynamic-access.sw-settings-rule.detail.associations.productVisibility',
            criteria: () => {
                const criteria = new Criteria();
                criteria.setLimit(this.associationLimit);
                criteria.addFilter(Criteria.equals('swagDynamicAccessRules.id', this.rule.id));
                criteria.addAssociation('options.group');
                criteria.addAssociation('swagDynamicAccessRules');

                return criteria;
            },
            api: () => {
                const api = Object.assign({}, Context.api);
                api.inheritance = true;

                return api;
            },
            detailRoute: 'sw.product.detail.base',
            gridColumns: [
                {
                    property: 'name',
                    label: 'Name',
                    rawData: true,
                    sortable: true,
                    routerLink: 'sw.product.detail.prices',
                    allowEdit: false,
                },
            ],
            deleteContext: {
                type: 'many-to-many',
                entity: 'product',
                column: 'extensions.swagDynamicAccessRules',
            },
            addContext: {
                type: 'many-to-many',
                entity: 'swag_dynamic_access_product_rule',
                column: 'productId',
                searchColumn: 'name',
                criteria: () => {
                    const criteria = new Criteria();
                    criteria.addFilter(
                            Criteria.not('AND', [Criteria.equals('swagDynamicAccessRules.id', this.rule.id)]),
                    );
                    criteria.addAssociation('options.group');

                    return criteria;
                },
                gridColumns: [
                    {
                        property: 'name',
                        label: 'Name',
                        rawData: true,
                        sortable: true,
                        allowEdit: false,
                    },
                    // ...
                ],
            },
        },
    ];
}
Let's go through the most important entries, how to configure your rule assignment:
| Option | Description |
|---|---|
| id | Required identifier for the assignment, which is arbitrary but unique |
| entityName, criteria, api | Required for data loading of the assignment |
| gridColumns | To define the columns, which are shown in your assignment card. Have a look into the data grid component for more information. |
Provide to delete an assignment
If you want to provide to delete an assignment, you have to define the deleteContext. There are two types of the deleteContext. The first one is the one-to-many type, which link to a column of the assignment entity like this:
// Example of a one-to-many deleteContext
deleteContext: {
    type: 'one-to-many',
    entity: 'cms_block',
    column: 'extensions.swagCmsExtensionsBlockRule.visibilityRuleId',
},
The other type is many-to-many, which has to link to the ManyToManyAssociationField of the extension like this:
// Example of a many-to-many deleteContext
deleteContext: {
    type: 'many-to-many',
    entity: 'category',
    column: 'extensions.swagDynamicAccessRules',
},
Provide to add an assignment
If you want to provide to add an assignment, you have to define the addContext. This context has the same two types as the deleteContext (see above), but the addContext has more options to fill out, because an add assignment modal has to be configured:
// Example of a one-to-many addContext
addContext: {
    type: 'one-to-many',
    entity: 'shipping_method',
    column: 'availabilityRuleId',
    searchColumn: 'name',
    criteria: () => {
        const criteria = new Criteria();
        criteria.addFilter(Criteria.not(
            'AND',
            [Criteria.equals('availabilityRuleId', ruleId)],
        ));

        return criteria;
    },
    gridColumns: [
        {
            property: 'name',
            label: 'Name',
            rawData: true,
            sortable: true,
            allowEdit: false,
        },
        {
            property: 'description',
            label: 'Description',
            rawData: true,
            sortable: true,
            allowEdit: false,
        },
        {
            property: 'taxType',
            label: 'Tax calculation',
            rawData: true,
            sortable: true,
            allowEdit: false,
        },
        {
            property: 'active',
            label: 'Active',
            rawData: true,
            sortable: true,
            allowEdit: false,
        },
    ],
},
The addContext needs a definition of the gridColumns, the entity and the criteria, like in the general configuration. Also, the context needs the column of the assignment and the searchColumn of the assigned entity.
A context of the many-to-many type would look like this:
// Example of a many-to-many addContext
addContext: {
    type: 'many-to-many',
    entity: 'swag_dynamic_access_category_rule',
    column: 'categoryId',
    searchColumn: 'name',
    association: 'swagDynamicAccessRules',
    criteria: () => {
        const criteria = new Criteria();
        criteria.addFilter(Criteria.equals('parentId', null));

        return criteria;
    },
    gridColumns: [
        // Definition of columns
    ],
},
Beside the properties of a one-to-many type you have to define the association with the name of the ManyToManyAssociationField.
Further reading
For more other information, refer to Add custom rules.