Create an Admin Extension
This guide explains how to set up an extension for the Administration UI.
Prerequisites
In order to follow this guide, make sure you are familiar with and meet the following requirements:
- Basic CLI usage (creating files, directories, running commands)
- Installed shopware-cli tools
- We will use the following libraries/software
- npm
- live-server (small local development live-reloading server)
Create the app wrapper
Create the app "wrapper", the so-called app manifest. It is just a single XML file with some basic configuration.
Create manifest file
Create the manifest file in a new directory. We'll call it our "project directory":
SimpleNotification/
├─ manifest.xml
INFO
When using a self-hosted Shopware version, you can create the project directory in the custom/apps directory of your Shopware installation. However, the descriptions in this guide apply to both Shopware cloud and self-hosted stores.
Next, add the basic configuration to the file:
<?xml version="1.0" encoding="UTF-8"?>
<manifest xmlns:xsi="http://www.w3.org/2001/XMLSchema-instance" xsi:noNamespaceSchemaLocation="https://raw.githubusercontent.com/shopware/shopware/trunk/src/Core/Framework/App/Manifest/Schema/manifest-3.0.xsd">
    <meta>
        <name>SimpleNotification</name>
        <label>Hi Developer App</label>
        <description>This app shows a notification in the admin panel</description>
        <author>shopware AG</author>
        <copyright>(c) shopware AG</copyright>
        <version>1.0.0</version>
        <license>MIT</license>
    </meta>
</manifest>
Set up communication between Shopware and the app
Next, we need to set up an entry point, so Shopware and your app can communicate. The entry point is a static .html file, which includes the Extension SDK script and defines our extension.
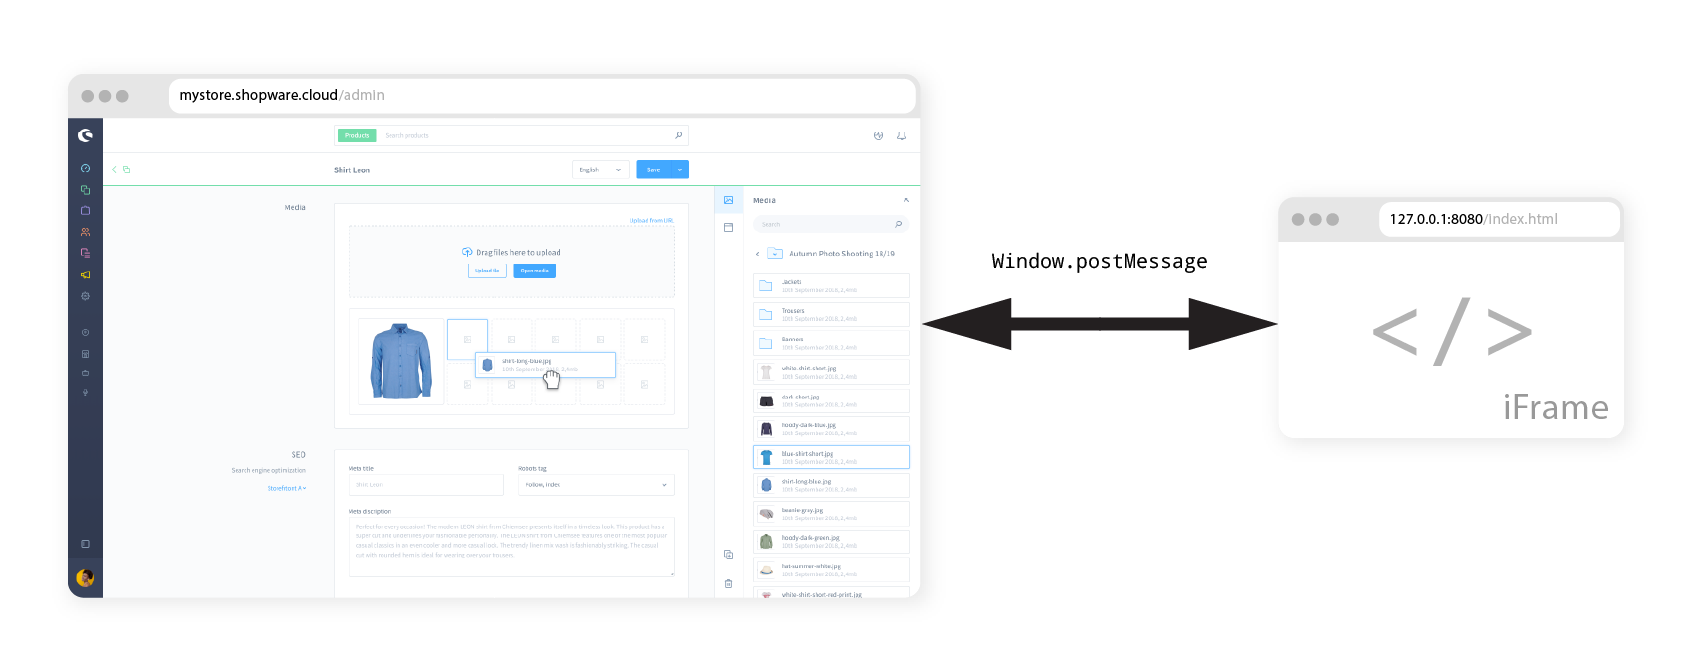
The file will be rendered as a hidden iFrame within your admin panel. Using postMessage requests, the iFrame and your admin panel can communicate and exchange data.
Let's create an index.html file in a directory called src.
SimpleNotification/
├─ src/
│  ├─ index.html
├─ manifest.xml// src/index.html
<!doctype html>
<html>
<head>
<script src="https://unpkg.com/@shopware-ag/meteor-admin-sdk/cdn"></script>
</head>
<script>
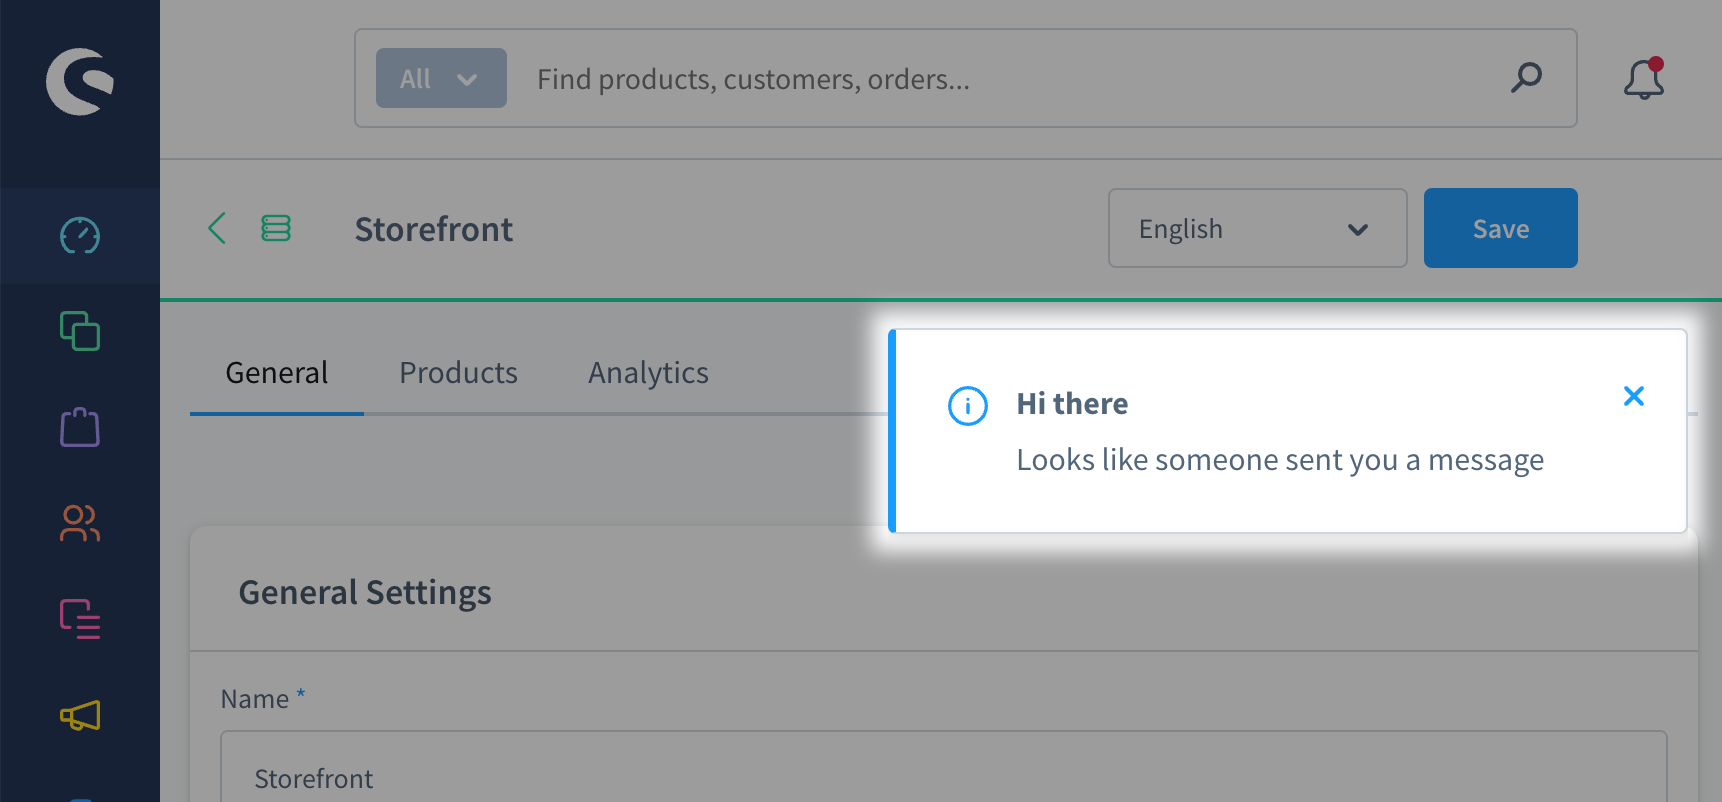
sw.notification.dispatch({
title: 'Hi there',
message: 'Looks like someone sent you a message'
});
</script>
</html>This file contains the basic setup for our app to display the notification:
- The HTML is rendered in a hidden iFrame when the Administration panel is loaded.
- The Meteor Admin SDK script is loaded through a CDN and exposed as the
swobject. - We use the
notification.dispatchSDK method to display a simple notification with a title and a message.
Start the local development server
Next, we need to start the live server, so you don't always have to reload the page manually.
npm install -g live-server
live-server src
Now the file should be available on http://127.0.0.1:8080.
Add the entry point link to your manifest
The final step of the setup is to configure your app to use that file as an entry point.
To do that, we have to add an admin section to our manifest.xml file and pass it into the base-app-url tag:
<?xml version="1.0" encoding="UTF-8"?>
<manifest xmlns:xsi="http://www.w3.org/2001/XMLSchema-instance" xsi:noNamespaceSchemaLocation="https://raw.githubusercontent.com/shopware/shopware/trunk/src/Core/Framework/App/Manifest/Schema/manifest-3.0.xsd">
    <meta>
        <!-- ... -->
    </meta>
  <setup>
    <registrationUrl>http://127.0.0.1:8000/app/lifecycle/register</registrationUrl>
    <secret>TestSecret</secret>
  </setup>
    <admin>
        <base-app-url>http://127.0.0.1:8080</base-app-url>
    </admin>
</manifest>
Since the URL to your entry point is only available locally, you will only be able to see changes on your own machine. If you want to share it, for development purposes, you need to host the entry point file somewhere or use services to expose local files as public URLs, such as ngrok.
For production usage, you should host the entry point file on a public CDN or a static site hosting.
Install the app
In this last step, we will install the app using the Shopware CLI tools.
INFO
If this is your first time using the Shopware CLI, you have to install it first. Next, configure it using the shopware-cli project config init command.
shopware-cli project extension upload SimpleNotification --activate --increase-versionThis command will create a zip file from the specified extension directory and upload it to your configured store. The --increase-version parameter increases the version specified in the manifest.xml file. This flag is required so Shopware picks up changes made to the manifest.xml since the last installation. When the app is successfully installed, you will see the notification pop up once you open the Shopware admin panel - congratulations!
Next steps
This example showed end-to-end how to create a local dev environment and connect it with your Shopware Store. There is a lot more to learn and try out, so why not move on with one of those topics:
- Add new sections or entire modules to the UI
- The Meteor Admin SDK also offers TypeScript support, including autocompletion
- Don't want to extend the admin panel? Have a look at App Scripts